%20-%20Copy%20copy.png?width=143&height=69&name=Black%20logo%20(002)%20-%20Copy%20copy.png)
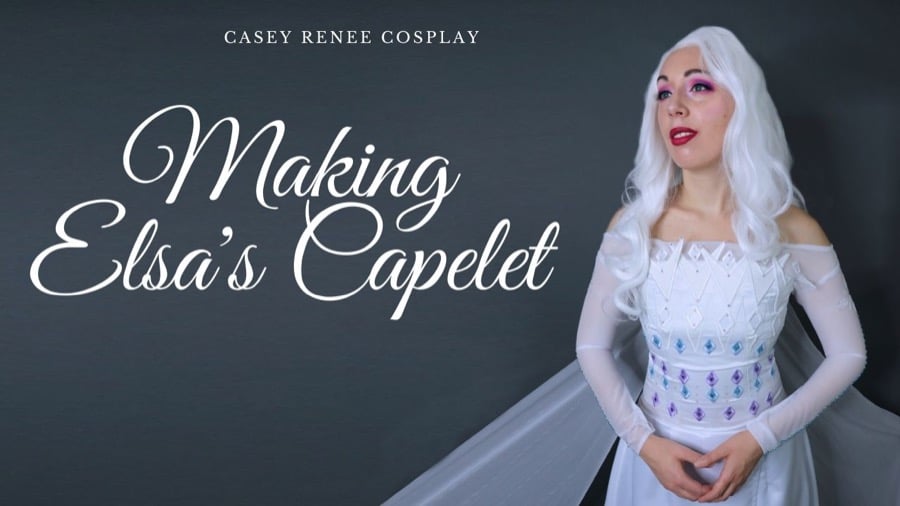
When I first sat down to watch Frozen 2, I had zero expectations — the first movie already hit it out of the park for me, and the second movie was, what I thought at the time, just going to be a lunch date with my favorite Disney sisters. Boy was I wrong. Anna and Elsa seemed to grow into adults and now had to face the adult world outside of Arendelle, and that aligned so much with what I was facing in my personal life.
I’ve always connected with Elsa, from “conceal don’t feel” to “show yourself”, and the transformation of her character in the final act of Frozen 2 was something I could have never prepared for. I’m not sure of the technical name for Elsa at this point, but I’ve been calling her “Spirit Elsa” because she almost transcends life in a sense — she becomes one with the spirits she grew up learning about, and so this final dress for me was a must make.
Here I dive into how to sew Elsa’s Dress from Frozen 2, complete with pictures and video tutorials!
For more cosplay inspiration and behind-the-scenes sewing content, be sure to follow @CaseyReneeCosplay on Instagram.
How to Sew Elsa’s Dress: The Fabrics and Threads
Once I knew I was going to make the dress, I actually purchased the Bruni stuffy from Disney World to help develop the color palette, plus I just really liked the idea of this chaotic fire spirit hanging out in my studio. I used Bruni as a reference when I picked thread and satin from Shannon Fabrics.
I used four shades of silky satin to create the runes on Elsa’s dress, then I paired the fabric with Floriani Embroidery Thread. For Christmas, I got the Frozen 2 art book which has detailed images on all the costumes in the movie, so in early March I started diving into the digitizing process. I made several “mock-up” embroidery pieces using purple thread since I did not have the white thread I wanted at the time.
How to Sew Elsa’s Dress: The Details
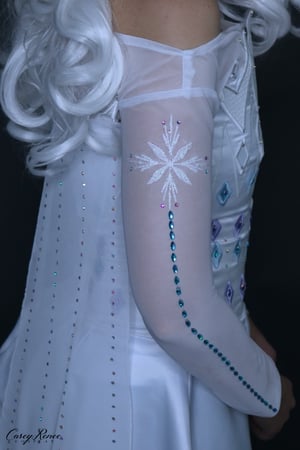
I paired my embroidery with Embellish Mylar and stitched it out on the Janome MB7 onto chiffon. The snowflake was the hardest part for me, but I think I did a good job at making it work with the mylar, and then I took artistic liberties on the “runes” all over her dress.

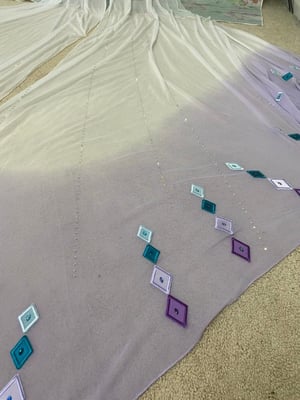
For the “runes” and V-shaped bodice pieces, I paired the Silky Satin with Floriani Tear Away Stabilizer since it fuses to the back. I love fusible stabilizers and stitched the embroidery out in multiples to reduce waste — I even saved the leftover stabilizer to use for gluing rhinestones later on.
I drafted the pattern for Elsa’s gown myself. This was a two-day event of me cutting and fighting with chiffon and cotton to get the bodice the way I wanted it. My crutch is that I prefer to corset under costumes — it’s more comfortable than an underwire bra and helps create the Disney Princess silhouette. Unfortunately, the illusion at the top of the bodice didn’t work with my current corsets, so instead I created a steel-boned coutil lining that allowed for me to define my waist and support my bust in the dress without a separate corset or bra.
Once my mock-ups of Elsa’s dress were complete, I jumped right into the bodice construction. I used a duchess satin for the solid white parts on the dress, and chiffon for the see-through bits. Since my satin was such a heavy weight, I didn’t have to flat line it and that saved me an extra step. I still had to satin stitch the details onto the dress, and then adhere the bodice embroidery using Sew Much Cosplay Mighty Fuse (boy do I love Mighty Fuse).
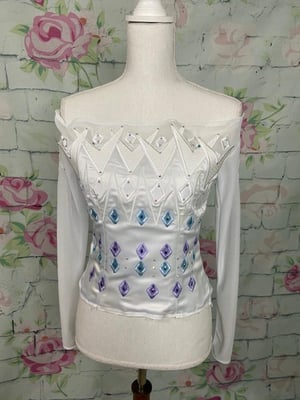
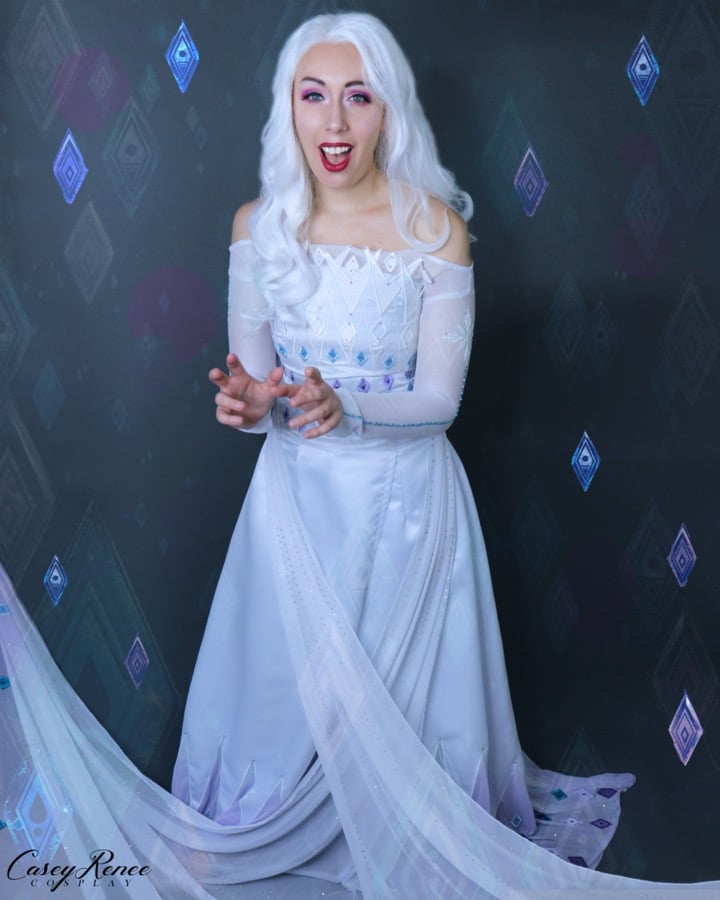
Finally, I added rhinestones all over. Some of them were in my stash so I have no clue where I got them, but I used 5,000 Bohemian AB rhinestones in size 16ss purchased from Beads Factory (yes that’s 5,000 rhinestones, wait ‘til you see the cape). They had a “50 percent off” sale, so the stones for this dress only set me back about $25 or so.
How to Sew Elsa’s Dress: The Cape
Naturally I decided to move on to the chiffon cape. I actually cut the chiffon cape and skirt out at the same time so I could do a narrow-rolled hem on my Janome Airthread 2000D. This was my first time doing this stitch on this machine and it went so smooth I thought I made a mistake (no mistakes were made, though, high five!).
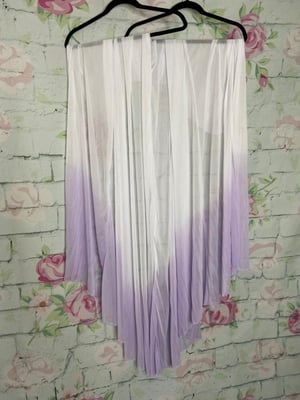
Once all my edges were finished, I brought my dress to the kitchen and dip dyed it in some Royal Purple synthetic dye from Rit Dye and let it dry for a weekend. Also, something to note is that my thread was polyester as well as the chiffon. That’s important because if I had used the synthetic dye with cotton thread, the thread would not have dyed too. The order of operations matters quite a bit in the dye process.
How to Sew Elsa’s Dress: Finishing Touches
So now I get to do my two favorite things, fuse the runes, and rhinestone the cape. This took me over 30 hours to do, and about 4,000 rhinestones were used just on the cape. I tried hard to stick to the images in the art book, but I ended up deviating a bit.
The last part was the skirt — this didn’t turn out how I wanted it to, but it looks good enough to wear and I might think about remaking at a later date. Since I had already dip dyed the chiffon, I had to now cut out the satin and mark it for the icicle-looking pieces on it. When I did this, I didn’t pay attention to my reference and it was too far down the skirt and was more “Betty Rubble” than “Ice Queen” (ya’ know what, that’s life sometimes). Instead of dwelling on the imperfection, I just made the best of it and satin stitched it onto the chiffon with a polyester thread from Quilters Select and it created this beautiful purple shift in the satin stitch. I’m pretty sure it just reflected off the gradient dye but it was magnificent.
Like the other pieces, I added the runes, rhinestoned it and then attached it to the bodice and added a 22” long zipper — and BAM!, I was living my Spirit Goddess Ice Queen Fantasy.
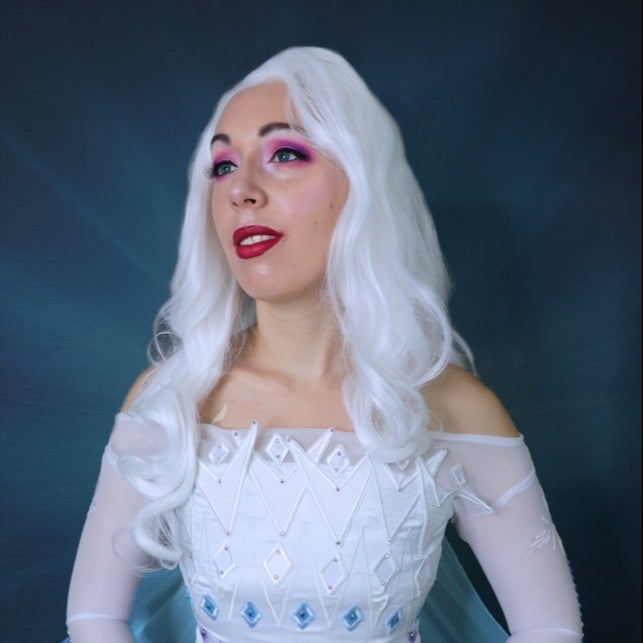
Okay, not quite yet, I still had to style a wig and whip up a pair of leggings to wear underneath this so I would be a bit kid-friendly, but you get the Icy Goddess vibes already.
Finally, with really good lighting, 10 pounds of makeup, hours of photoshop (mostly on the backdrop since I don’t actually live in an ice cavern), I have turned myself into the Disney Princess we all know and love.
If you have any questions about our fabrics or any of our Cuddle® Kits, feel free to contact our friendly, no-pressure customer service team at 866-624-5252.
Ready to start creating your own cosplay costume with our fabric? Use our store locator to find a selection of our fabrics online or near you.


.jpeg?width=640&name=Image%20(5).jpeg)


Leave a Comment