%20-%20Copy%20copy.png?width=143&height=69&name=Black%20logo%20(002)%20-%20Copy%20copy.png)
Hi, I’m Sayakat Cosplay, and I have been making my own costumes and props for over a decade. I specialize in armor and props, but my cosplay skills are quite broad and I love giving back to the community, helping others to learn and grow with their own costumes and cosplay skills.
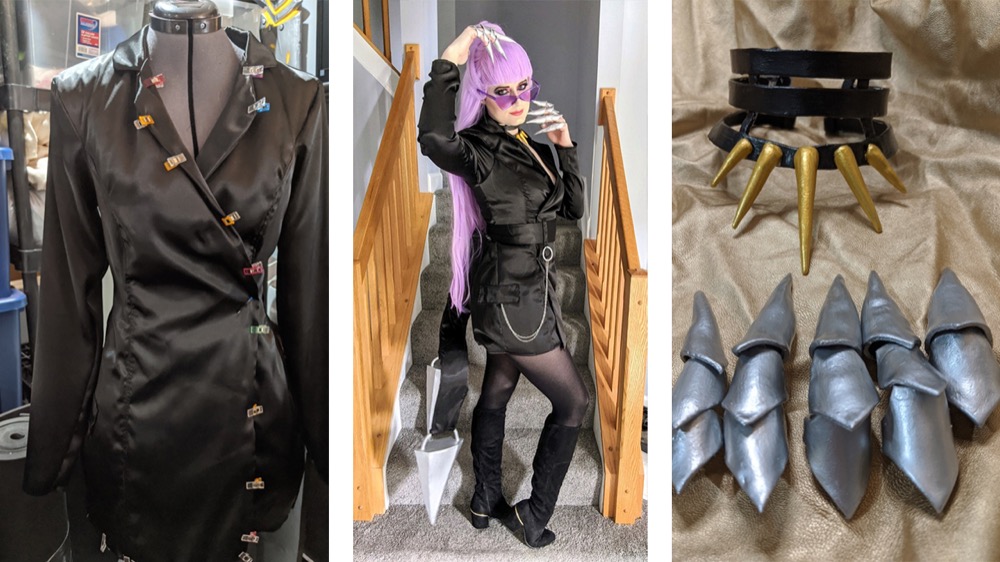
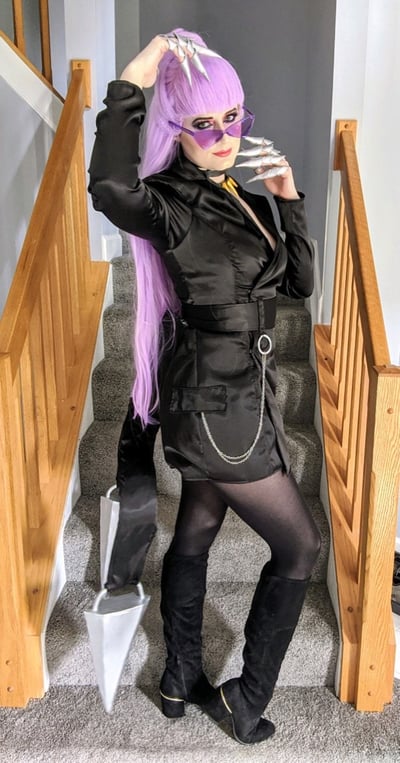
You can find my latest projects here on my Instagram, but today I’m sharing my step-by-step K/DA The Baddest Evelynn cosplay sewing tutorial!
Recommended materials, notions and fabrics for this K/DA The Baddest Evelynn cosplay sewing tutorial
Claws, necklace and spikes:
- Heat gun
- Utility knife
- Hot glue gun
- Barge contact cement
- Hot glue sticks
- Blade sharpener
- Silicone baking mat
- Cutting mat
- Acrylic white paint
- Acrylic silver paint
- Black Worbla
- Gloves for working with Worbla
- EVA foam (in various thicknesses) and foam dowels
- Wire
Coat dress:
- Shannon Fabrics Silky Satin, 4 yards
- Famore Cutlery scissors and seam ripper (Code SAYAKAT for a discount)
- Interfacing - 3/4 yards
- Thread
Wig:
- Arda Venus SILKY (iris)
Step-by-step K/DA The Baddest Evelynn cosplay sewing tutorial
Claws, necklace and spikes
For Evelynn, I decided to make the finger armor/claws out of Worbla. They look like metal in the art, but I don't do metalwork and they need to be thin and durable, so thermoplastics it was. You could make these out of 2 mm craft foam or 3D print them, but in my opinion, thermoplastics are going to fit the best and be durable at the same time.
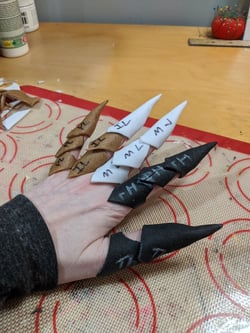 I actually ended up using three different types of Worbla on the fingers (brown, black and pearly) since I was using scraps. I would recommend either black or pearly over brown, as the texture of those two is better and less bumpy. The great thing about Worbla is even though it’s expensive, the scraps can be heated up, combined and made into new sheets. I have been accumulating scraps for years and have a huge bin I dip into occasionally for projects like this.
See Related: How to Sew Elsa’s Dress from Frozen 2 (Elsa Cosplay Sewing Tutorial)
I decided not to back the finger pieces with foam, but you could if you wanted or you could use thin cardboard. Instead of backing them, I used a double layer of Worbla (about 2 mm thick). A double layer of Worbla does not deform as easily as a single layer and is easier to work with. When working with Worbla, please be aware that it gets sticky when hot. It can stick to your work surface if you aren't careful, so I work with it on a silicone baking mat.
I made a pattern for each finger out of paper and tape by wrapping my finger in paper and tracing out the pattern. I traced each pattern onto the Worbla. A pro tip for cutting is to heat the Worbla up slightly before cutting — this will make it easier to cut, especially if you are cutting out small pieces like the finger pieces from a double thickness.
The finger pieces overlap with points towards the hands, so I made the ring section first, followed by the knuckle and then the fingertip. For the fingertip, I start pushing the seam together at the tip and then closing the seam down towards the open end. I sanded the seam with a Dremel to smooth it out.
To prime the finger pieces, I used a couple of layers of HexFlex. I painted the fingers with white acrylic paint as a base, and then silver over the white. I didn’t add crystals, but if you want to embellish the ring finger claw with crystals, you can.
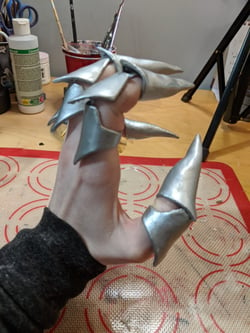 To attach all the pieces for each finger, I used quarter inch elastic, took a bit of hot glue and glued the elastic to the fingertip first. You don't need much glue (be aware this will make the finger pieces fit a bit snugger on your finger, you may want to account for it when making them) and don't glue all the way to the edge of the piece as you want to allow for the pieces to overlap when your finger is at rest or not bent. I figured out where the knuckle section belonged, and did the same thing for the knuckle and then the ring section.
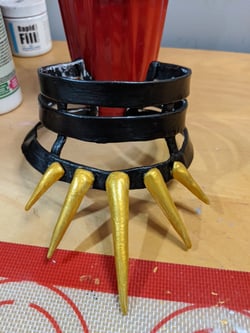
You can probably make the necklace piece out of fabric or leather (or buy something similar), but I decided to make a solid piece out of Worbla. It’s quite flexible when it is really thin, thus the finished piece is really comfortable and flexes easily with neck movement and is easy to take on and off. To make the strap sections, I combined a bunch of scraps and rolled them out to an approximate thickness of 2 mm.
While the Worbla was still warm, I traced the template and cut out the strips. I carefully heated the strip into an open circle shape and let it cool completely before moving it. When the Worbla is really thin it's malleable for a long time, so be careful and go slowly when making a piece like this. I repeated this step two more times to make three strips and the three tiers of the necklace, making the strips slightly longer each time since my neck gets wider as it meets my shoulders. For the lowest tier, I angled it in a bit as that piece lays sort-of on where my neck joins my shoulders and is not straight up and down.
See Related: Harry Potter Durmstrang Dress Cosplay Sewing Tutorial (& Video)
To connect all the pieces, there are little strips that run vertically in two places in the front. I put all the Worbla circles on my neck and marked the locations for tiny strips. Heat up some really tiny strips, heat where you are connecting them to (always heat both pieces of Worbla when joining pieces) and slowly and carefully start to connect the pieces. You will need to wait for the pieces to fully cool before moving to the next step. I also connected all the pieces at the back for added stability. I made sure to blunt any sharp edges at the back, as any sharp points can scratch you if you aren’t careful putting the piece on and off.
The spikes are a bunch of scraps rolled together into a spike shape. I made five spikes in three different lengths. I used the same primer as the fingers and basic acrylic paints to finish the necklace.
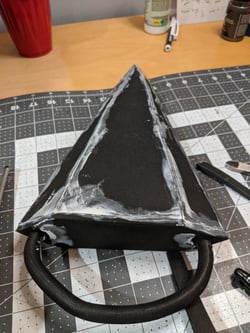
I tried to make the spikes as lightweight as possible, so I made them out of 6 mm foam and made them hollow. The spikes are multifaceted, so each side of the spike has three sections. Trace, cut out and prep for glue. I cut the edges of the pieces at a 45-degree angle to make the pieces come together better, especially at the tip. I used barge contact cement to glue each side together and then glue the sides together. Make sure to use a respirator and glue in a well-ventilated area when using contact cement.
For the handle, I used 12 mm foam dowels and cut a shallow divot in each dowel to accommodate the wire that's going in the middle of the handle. I want the handle to be sturdy, so it needs wire to be as sturdy as possible and support the dowels. The wire is from an old wire coat hanger. I wouldn't use floral wire as that bends too easily.
Insert the handle into the back of the spike before applying glue to the pieces. Glue in the handle and the back to close the spike. I cleaned up the edges and gap filled using QUICKSEAL. I did two to three coats of as it shrinks as it dries. I primed and painted in the same manner as the claws and necklace.
 To make the spike arms, I used wire from coat hangers, made a small hook on one end to attach the spike to and hot glued on a 3.5-inch wide strip of craft foam the length of the wire (leave the hook free of the foam). I made the spike arm about three feet long. To cover all the glue mess, I glued on a smaller strip of foam over the glue and wire. I sewed some spike arm covers from the same satin as the coat dress by cutting 4.5-inch by 36-inch-long strips and sewing three sides shut. Turn the fabric cover inside out, and slide the wire/foam strip into the fabric hook side first. Once assembled, I placed the spike into the hook, and I hot glued the spike/fabric/wire. The spike hangs down in the art, so I wasn't super worried about the spike needing to be at any specific angle.
I whip stitched the fabric over the spike handle, and top stitched the fabric to the foam. You can easily sew through craft foam as long as there’s no glue that the needle might go into or through. I glued the fabric shut at the end of the arm, glued Velcro on to the end, and sewed some Velcro onto the dress under where the belt lies so the belt hides the connection point. The spike arm is poseable and simply attaches with Velcro onto the dress.
Wig
I styled Evelynn’s wig with my own interpretation. I chose to style it into a single central bun, but you can easily switch this for two smaller buns, etc. Unfortunately I styled this before some art clarifying her hairstyle was available.
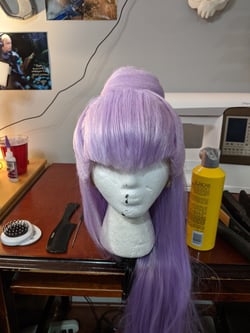 The wig I am using is an Arda Venus SILKY in iris — I went with the silky version since it's less prone to tangling (this is a longer wig and longer wigs will tangle no matter what, but the silky fibers tangle less). This is a non-lace front wig — I chose not to use a lace front for budget reasons, but if you have a bit more to spend, a lace front will make your life a bit easier when it comes to styling the wig.
See Related: 3 Easy Tips for Sewing with Faux Fur for Cosplay
Evelynn has a very stylized 50s-style bang that looks like it has some poof to it. Before I put the wig on the mannequin head, I tried the wig on and cut a small section at the middle front of the bangs to mark the final length of the bangs. I'm first going to add texture to all the bang fibers by heating small sections with a flat iron and then teasing the section while the fibers are still hot. I did this to all the bangs and let the fibers cool completely before brushing out all the teasing. It will look like a complete hot mess as you do this, this is fine and normal. Brush out all the teasing, and start to style — I found where I had marked the bang length and did a first rough cut to take out most of the length I didn't need.
I smoothed out the top layer of fibers with the flat iron and used hairspray and the hairdryer to set the fibers at the top of the bangs for more poof. I used Got2b Glued hairspray. It’s pretty much the gold standard for wig styling — I've tried other hairsprays and they just don't work as well. Setting the spray with heat makes it set quickly and holds really well.
To shape the bangs into a “V” shape, I worked slowly both blunt cutting and point cutting to get to the final shape. Once you try your wig on, you may need to make adjustments to your wig, this is normal as how it looks on the mannequin head might be different from how it looks on.
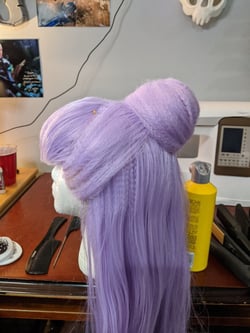 Once the bangs are styled and thoroughly set, it's time to move on to the bun/sides of the wig. I separated out the hair going into the ponytail except for the sideburn sections. Since this is not a lace front, the sideburns have wefts right up to the edge. To avoid seeing the weft tracks, I used my crimping iron to crimp and texture the top couple of inches of the wig fibers in those sections. This makes hiding the wefts easier and gives the fibers more coverage. Once crimped, I went ahead and crimped the top couple inches of fiber all around the top under the ponytail and brushed that out to basically do the same thing. This wig isn't wefted to be a ponytail wig and the wefts are somewhat visible if you pull the fiber up too much or pull too much fiber into the ponytail. This is just hedging your bets and texturing the upper sections of the fibers to give more coverage over where wefts might be exposed.
Once that was done, I styled and set the sideburn sections so that none of the wefts were exposed, set them with spray, and put those sections into its own hair tie. I finalized the ponytail section and set to styling the bun. To create the center of the bun, I teased some sections of the ponytail. I didn't need all the fiber from the ponytail since this creates a nice light core for the bun. I set the bun core with spray and some bobby pins, and then was ready to wrap it with more fiber to make the outer layer. I crimped a couple of sections (this makes covering the core easier) and started laying that down around the outside of the bun, spraying and setting those sections until the entire outside of the bun was the crimped fiber and the teased core was entirely hidden.
At this point I tried the wig on, and discovered that like most wigs, I suffer from my head is too small for the wig and I needed to do some interior wig surgery to make the wig fit correctly. I cut three wefts behind the sideburn section to allow room for my ear and the wig to sit around it comfortably, and I moved the elastic from where it attached to the sideburn section up and over. I used a curved wefting needle and some regular thread doubled over to do this. Not everyone will need to do this, but for us tiny head folks, doing this type of interior work makes the wig fit better and more comfortably for long-term wear.
When I wear the wig, I use eyelash glue or spirit gum to glue down the sideburn sections over my own sideburns, otherwise it won’t sit flat because of the internal surgery.
Coat dress
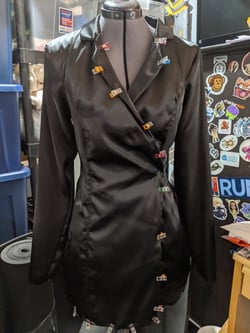
This is made of Shannon Fabrics Silky Satin and is fully lined in the same fabric; I cut all pieces out twice on doubled over fabric so I had four of everything, except the collar. I also interfaced the outer layer to give the garment more structure as satin is a lightweight fabric. I used medium weight interfacing on the front pieces and lightweight interfacing on the back, although I probably could have used the same medium weight on the whole thing. I sewed together the back darts before interfacing, but you could interface and then sew (that order of operations is interchangeable).
I self-patterned the coat as I did not have a commercial pattern in my collection that was close enough to her coat that I could alter. I made the pattern, and then made a mock up out of muslin. Always make a mock up — I’ve learned that the hard way, even if you are using a commercial pattern. Fixing fit issues is way easier and less frustrating on a mockup than if you are using your final fabric, especially if that fabric is really fancy and expensive.
I quickly sewed up the mockup to check fit, and after adjusting a few things, took apart the mockup to use as my final patterns for the coat. I used a ⅜- to ½-inch seam allowance with the pattern.
See Related: Cosplay Sewing Tutorial: How to Sew a Batwoman (Kate Kane) Costume
If using a satin or satin type fabric, use a #70 needle, normal foot and a small running stitch. Tension and stitch settings will vary depending on the sewing machine you use, make sure it is set correctly for your fabric choice.
I sewed together the darts on the back pieces first, and then interfaced the whole fashion layer. I sewed up the back seam and topstitched the center back seam for extra detailing and to make sure that seam laid flat. I sewed the front pieces together and then sewed the back to the front. I sewed in the sleeves, and did all the same steps for the lining. I sewed on the collar, and then placed the coat and lining right sides together, pining together along the front edge (this would allow me to flip the lining in and finish the sleeves and hem after lining installation). I adjusted the hem and sleeves, sewing the raw edges inwards and using the overlap of the lining to hide all raw edges.
I added four snap closures to the front of the coat dress. To make the belt, I cut two 4-inch-wide by 30-inch-long strips, interfaced both strips, sewed together the right sides along three edges and flipped it around right sides out. I top stitched around the entire edge, and added Velcro to finish it and add a closure. I added small belt loops to the dress by hand, and with a few final details, the coat dress was finished!
-Tegan
If you have any questions about Cuddle® minky plush fabrics or any of our Cuddle® Kits, feel free to contact our friendly, no-pressure customer service team at 866-624-5252.
Ready to start creating with Cuddle® minky fabric? Use our store locator to find a selection of Cuddle® minky fabric online or near you.


.jpeg?width=640&name=Image%20(5).jpeg)


Leave a Comment