%20-%20Copy%20copy.png?width=143&height=69&name=Black%20logo%20(002)%20-%20Copy%20copy.png)
The way Shannon Fabrics Cuddle® and Luxe Cuddle® fabrics add texture and dimension to sewing projects is one of the things I love the most about it. The Petal Pop Santa pattern by Sugar Bee Quilts is perfect for playing with all the different textures and types of fabrics Shannon offers — and after making this up, I have a couple tips for making it work and look good as well!
See Related: How to Sew a Holiday Bench Pillow Cover (Whimsy Winter Bench Pillow Tutorial)
Let me introduce myself! My name is Emilee Masson and I am a Shannon Fabrics Brand Ambassador and sales representative in South and North Dakota. I have created a few projects for the blog in the past, and I’m excited to be back. I love recreating projects using Cuddle® and Luxe Cuddle® instead of cotton!
How to Sew a Santa-Themed Holiday Pillow (Petal Pop Santa Pattern Sewing Tutorial)
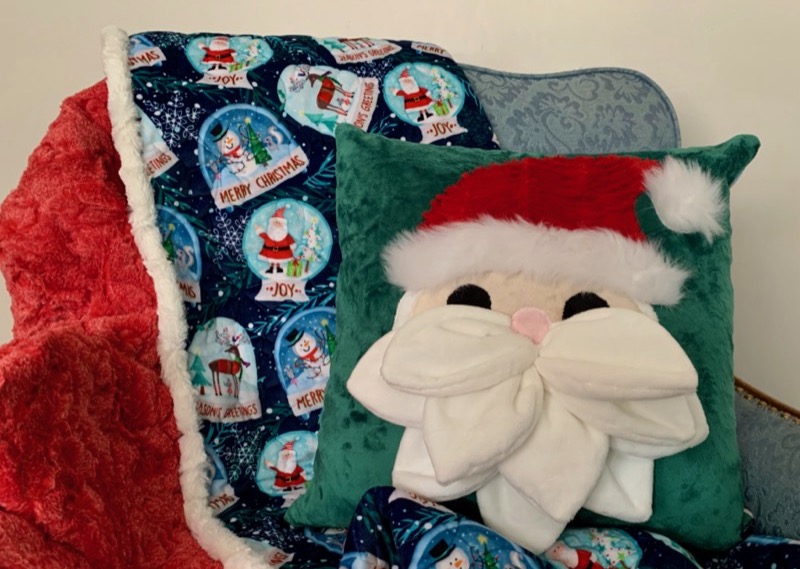
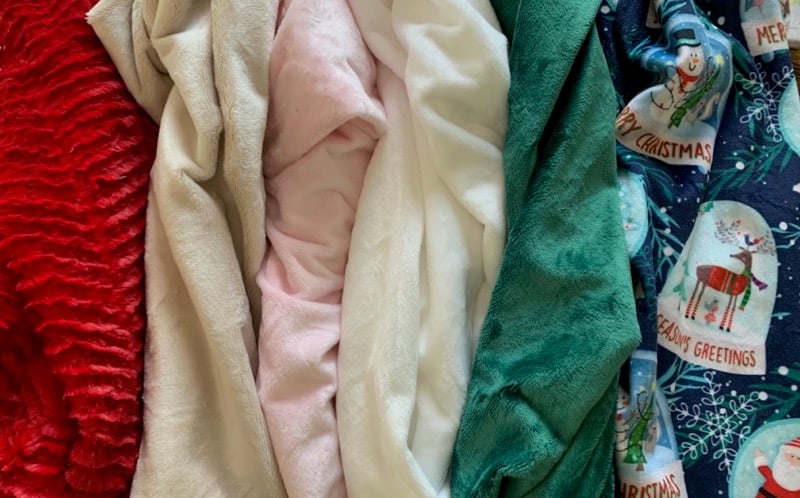
The Petal Pop Santa pattern is the perfect opportunity for trying Cuddle® applique! The large, simple shapes translate wonderfully to a variety of Cuddle® fabrics. Here are the fabrics I used:
- Cuddle® 3 Emerald for background
- Luxe Cuddle® Ziggy Scarlet for the hat
- Cuddle® 3 Black, Baby Pink, Latte for the face; and Snow for the beard
- Fun Fur Cut Monkey White for the hat trim
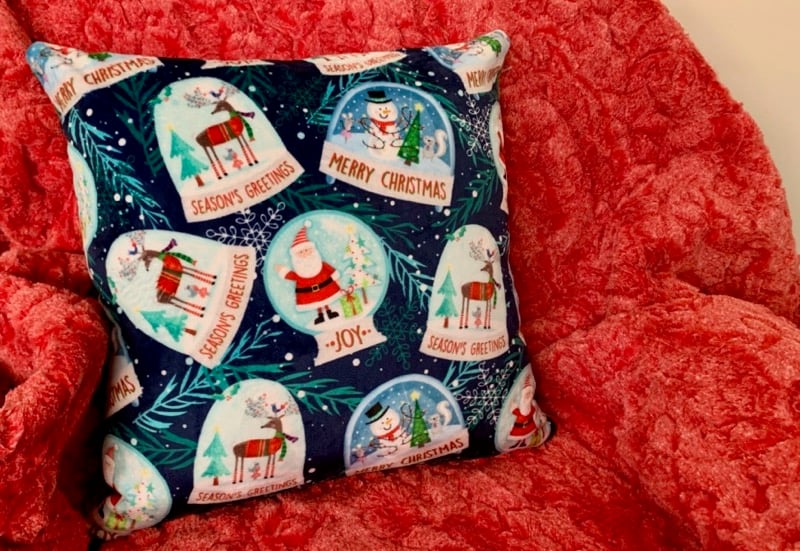
- Snow Globes Digital Cuddle® in Navy for the back of the pillow (and the front of the blanket)
I started by making the petals for Santa's beard. I used the acrylic Petal Pop Petal template from Sugar Bee Quilts and highly recommend it. While you certainly could use the paper template included in the pattern, the acrylic template made it very easy to cut out the petals with a rotary cutter and mat! I sewed around the petals using my walking foot and used a couple pins to hold them together.
.jpeg?width=800&name=Image%205%20(1).jpeg)
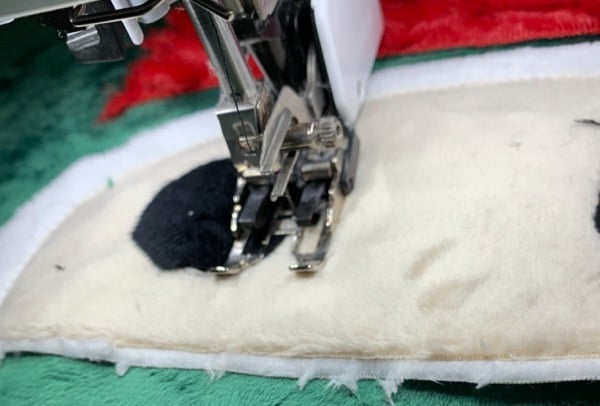
Next, I prepared my background. I fused my background to fusible fleece. I prefer to do this to help support the applique and to give the pillow a more substantial structure. While the iron was hot, I also fused Steam-A-Seam Lite to the back of my face and hat pieces (not the trim, but more on that later).
Pressing and fusing Cuddle® fabric is very easy — just make sure to use a Teflon applique pressing sheet and move the iron frequently. I check my progress often and try to fuse it for the minimal amount of time. Cut over the trash can and carefully vacuum the edges of each piece.
Now that everything is fused and ready, I laid out my pieces and fused them to the background (not the nose -- we need that later). Back at the sewing machine, I stitched down the pieces using a “smallish” zigzag stitch. Applique with Cuddle® is the best! I like to use a zigzag stitch and most of the stitches disappear into the fabric, so close counts!
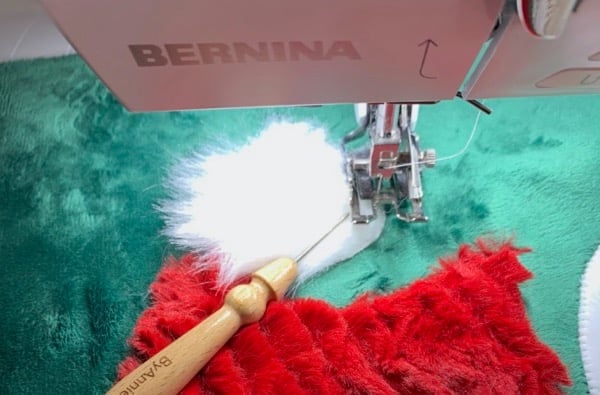
On to the hat trim — I tried to fuse the Monkey Faux Fur, but it didn’t want to hold so I just cut out the pieces and sewed them down. To cut them out, I used short bladed, small scissors just cutting through the backing of the fabric (careful to avoid cutting the pile of the fabric).
I used a couple long pins to hold it in place while I sewed around it with the same zigzag stitch. I found my ByAnnie’s Stiletto and Pressing Tool to be super useful in keeping the pile out of the way of my sewing machine needle. I went slow and steady using the awl and paying close attention to my pins as not to lose them or sew over them.
To attach the beard, there are a couple things you want to pay close attention to. The layers really start to add up fast in this step. I recommend laying out and pinning the beard first. You will overlap the petals in rows a bit to get the layered look, but try to space the rows so that you can sew each one down without catching the next one. This is very important for the top row, because appliquéing the nose on is the final step and it needs to cover the edges of the moustache. I didn’t do this and struggled to get them sewn down — do what I say, not what I did!
Once you have the layout figured out, remove the top two rows and stitch down the first one. Go VERY slow and use a longer stitch length. Do the same for layers two and three. I broke a needle and struggled with this. I was able to get it my second try, but it was challenging.
If your machine is really mad about it, you could hand sew/tack the petals down as well. I was able to applique the nose down using my machine with a small zigzag and going VERY slowly. You could also add a pompom or a button if your machine will not cooperate on this step.
Finishing the pillow came together very quickly! I added fusible fleece to my backing fabric and a zipper in the bottom — I like to change my pillows seasonally, and zippers make that so much easier! I love how the back of the pillow and blanket look together as well — it's like having two sets!
The other projects in the photo are a machine quilted (long armed) and bound blanket. The backing fabric is Luxe Cuddle® Heather in Peppermint and it is bound in Luxe Cuddle® Hide Snow.

Thank you for joining me today! I would LOVE to see a picture if you make the Petal Pop Santa in Cuddle® and Luxe Cuddle®!
If you have any questions about Cuddle® minky plush fabrics or any of our Cuddle® Kits, feel free to contact our friendly, no-pressure customer service team at 866-624-5252.
Ready to start creating with Cuddle® minky fabric? Use our store locator to find a selection of Cuddle® minky fabric online or near you.


.jpeg?width=640&name=Image%20(5).jpeg)


.jpg?width=640&name=Image%20from%20iOS%20(9).jpg)


-1.jpg?width=640&name=Image%20from%20iOS%20(3)-1.jpg)


.jpg?width=640&name=Image%20from%20iOS%20(5).jpg)


Leave a Comment