%20-%20Copy%20copy.png?width=143&height=69&name=Black%20logo%20(002)%20-%20Copy%20copy.png)
How to Make a Reindeer Scarf
By Sheila Ryan
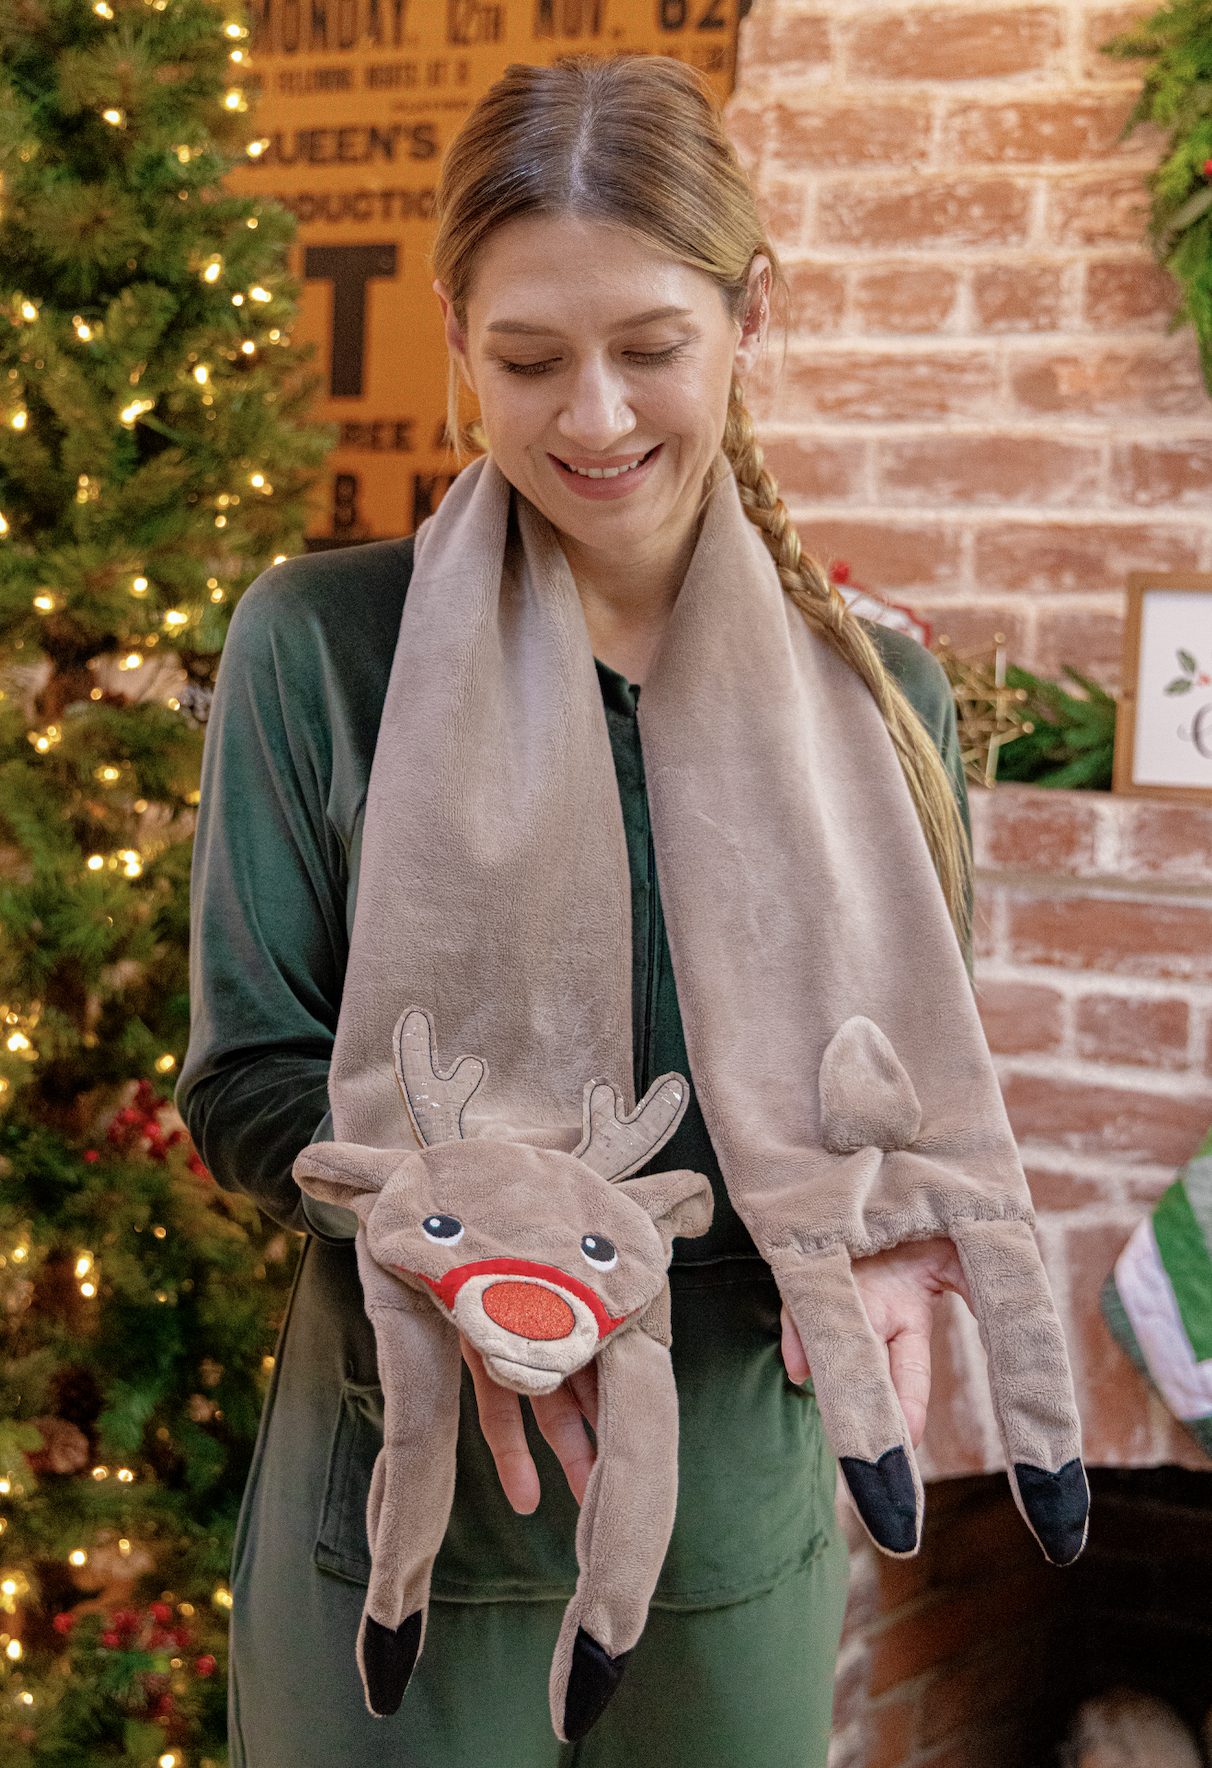
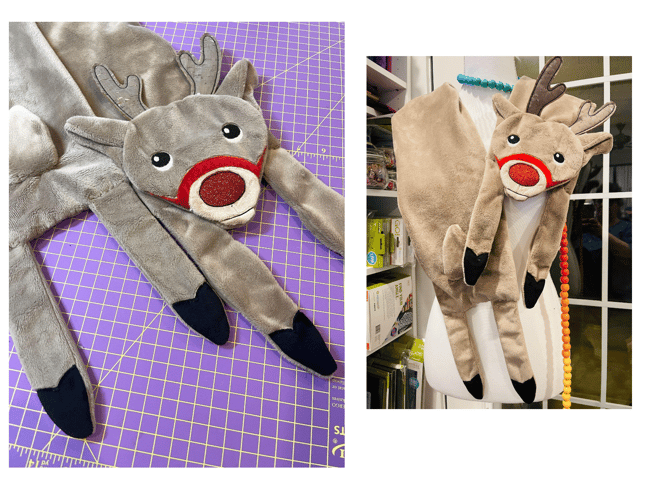
For today’s 12 Days of Cuddle project we are showcasing this adorable Reindeer Scarf!
This Reindeer Scarf project is a machine embroidery file, designed by Snuggle Puppy Appliqué: https://snugglepuppyapplique.com/
The parts like the face, legs, and tail are all created on the embroidery machine for a beautiful effect
and the scarf is finished on a sewing machine or serger with just a tiny bit of hand stitching at the end!
Project info:
Link to pattern: https://snugglepuppyapplique.com/collections/christmas/products/ith-reindeer-scarf
Fabrics used: C3 Cuddle® in Simply Taupe, Latte, & Quilting Cuddle® in Scarlett and Black
Machines used: Redline 1501 Embroidery Machine and Bernina L890 Overlocker
These are the ingredients you will need to make the Snuggle Puppy Appliqué Reindeer
Scarf out of Cuddle Fabric: List of materials:- ½ yard C3 Cuddle® scarf, Reindeer Face, Legs, and Tail in Simply Taupe
- 5” x 5” piece of C3 Cuddle® in Latte for face muzzle
- 5” x 5” piece of Quilting Cuddle® or C3 Cuddle® in Scarlet for bridle
- 6” x 6” piece of Quilting Cuddle® or C3 Cuddle® in Black for hooves of front and
- back legs
- 2” x 2” piece of Red glitter upholstery vinyl or glitter canvas for nose applique
- 6” x 6” piece of polyester craft felt for antlers
- 3” x 6” piece of thin cork fabric (I used the Cork Fabric from Bellagio in Taupe/Silver
https://belagioenterprises.com/products/cork-fabric-style-98-82-taupe - 40 wt polyester embroidery thread in colors to coordinate with fabric, along with
- Black and White
- 90/14 Stretch machine needle for sewing machine or 90/14 ELX701 SUK for serger,
- 75/11 Sharp Needle for Machine Embroidery
- Rotary cutter and mat (Olfa)
- Rotary Cutter
- Micro-serrated scissors
- Double Curved Applique Scissors
- Wonder clips
- 6x10 or 8x8 embroidery hoops for your embroidery machine
- Tearaway embroidery stabilizer
- EZ Point and Turner tool
The Reindeer Scarf is a pattern for an adorable holiday scarf. It is perfect for adding a festive flair to all your holiday outfits and is customizable for both adults and children! The pattern walks you through each step of the construction process with clear photos of each step. You can choose the files for either 6x10 or 8x8 embroidery hoops.
1) First you will construct the Reindeer Ears and Antlers. Each embroidery file includes a placement stitching line so you know where to place your fabric on the hoop to be prepared for stitching. You run the placement lines so that you know where on the hoop to place the front and back pieces of fabric. For the antlers, you actually place felt on the front and back of the hoop, covering those placement lines, then I added a glittery silver and taupe cork fabric on top of the felt to give the antlers just a bit of sparkle!
2) After the antlers are done stitching, keep the hoop on the machine, and place the ear fabric right sides together over the placement lines and stitch the ears out. After the ears are done stitching, you can take the stabilizer out of the hoop, and cut out the antlers and around the ear stitching. The ears are open at the bottom so that you can turn them right side out. Since I am using Cuddle® fabric that has a bit of natural stretch, I don’t need to do a lot of notching around the curves, but you can if you need to get a nice curve around the tops of the ears.
3) After the antlers and ears, you can start working on the Reindeer Face. In true appliqué style, stitch the reindeer face from the background pieces to the foreground pieces, layering the background, bridle, muzzle and nose materials in the order of the embroidery stitch set up, then you will use some water soluble or heat soluble topper film to help the rest of the face detail stitching stand out against the pile of the Cuddle® fabric.
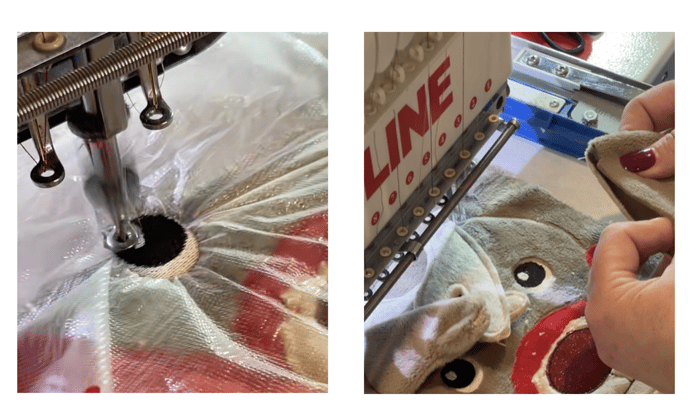
4) Once you remove the topper film, you then apply the antlers and ears to the face and sandwich them between the back piece of the reindeer head fabric. This makes a beautiful finish for the reindeer face, and after you remove the face from the hoop you simply make an opening in the back of the head fabric and flip the face right side out.You can sew up the opening now, or wait until the end of the project when you will be hand sewing the head to the scarf.
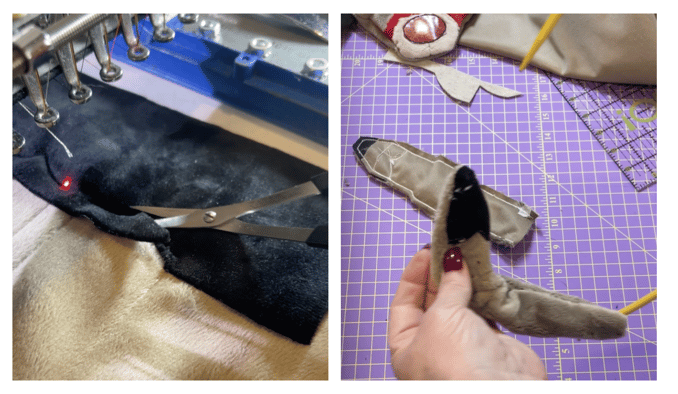
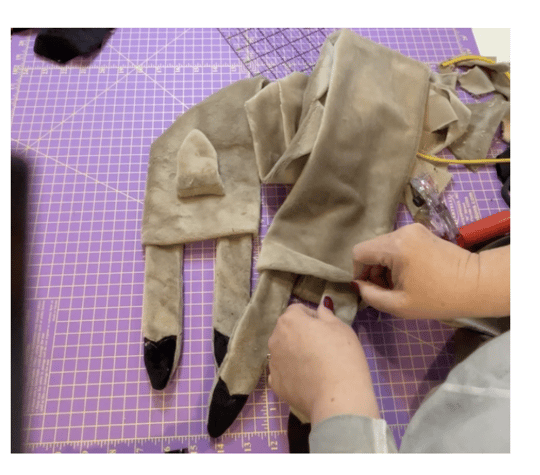
5) Now that the face of the Reindeer is done, stitching up the front and back legs and the tail is a cinch, For the front legs, you lay down your C3 Cuddle® across the placement stitching lines, then appliqué the hooves with black C3 Cuddle® or black Quilting Cuddle®. Cover the whole legs with the back leg material and then run the final stitches, which leaves an opening for you to use the EZ Point and Turner Tool to turn the legs right side out. The tail is stitched at the same time as the back legs, and there is no appliqué, but it stitches just like the ears stitch, Super simple! Once you have all the legs and the tail stitched, remove the stabilizer from the back side of all your pieces, and then cut them out.
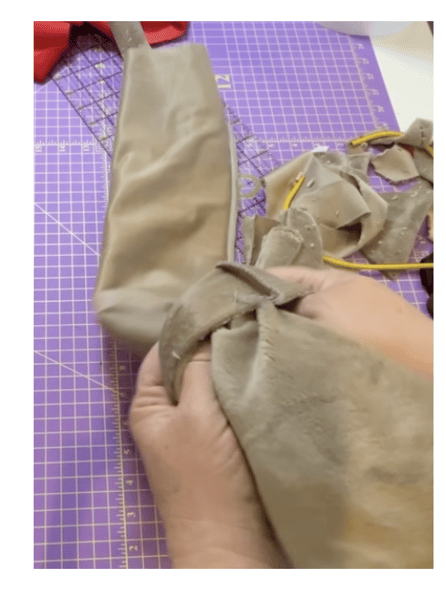
6) You can make the scarf by stitching the long edges together with a sewing machine or a serger with a ½” seam allowance (remember when sewing Cuddle you meed to lengthen the stitch length on both your sewing machine or serger and lower the presser foot pressure!) The scarf can be as long as you want it to be depending on if it is for an adult or a child, and since it is a simple tube, it is ok to cut it out from the width of the fabric.
7) Once your tube is stitched closed, turn it right side out. Position the seam at the center back of the scarf, and sew in the back legs to one end and the front legs to the other end with the appliquéd hooves facing the “right side” ofthe scarf and then closing up the gap between the legs at each end. You can sew the tail onto the back leg side of the scarf on the right side, but position the tail so it is pointed up away from the legs, just like when a deer is hanging out in nature! Hand sew the face to the other end of the scarf with the front legs. I secured mine down with a few stitches at the left and right sides of the face and then between the antlers at the top of the head.
8) Double check that all your appliqué areas are nice and tidy, and trim any loose threads and your scarf is DONE! You can add some tiny jingle bells to the bridle of the Reindeer Face for even more fun!
I had SO much fun using my embroidery machine and my serger to bring this sweet Reindeer Scarf to life! If you end up making some Reindeer Scarves out of Cuddle® this holiday season, we’d love to see them in the I Love Cuddle Fabric facebook group or tag #shannonfabrics over on Instagram! Happy Sewing and Happy Holidays!


.jpeg?width=640&name=Image%20(5).jpeg)


-Dec-11-2025-10-58-46-1415-PM.png?width=640&name=Untitled%20design%20(3)-Dec-11-2025-10-58-46-1415-PM.png)


.png?width=640&name=SEW%20TOGETHER%20livestream%20promo%20images%20(4).png)
.jpg?width=640&name=gencoreA%20(1).jpg)
-Oct-06-2025-07-25-25-9749-PM.png?width=640&name=SEW%20TOGETHER%20livestream%20promo%20images%20(1)-Oct-06-2025-07-25-25-9749-PM.png)

-4.png?width=640&name=SEW%20TOGETHER%20livestream%20promo%20images%20(3)-4.png)


.jpg?width=640&name=spring%20tea%20party_049%20(1).jpg)


.png?width=640&name=12%20Days%20of%20Cuddle%C2%AE%20(8).png)
.png?width=640&name=12%20Days%20of%20Cuddle%C2%AE%20(3).png)
-2.png?width=640&name=12%20Days%20of%20Cuddle%C2%AE%20(2)-2.png)

-2.png?width=640&name=12%20Days%20of%20Cuddle%C2%AE%20(4)-2.png)
.png?width=640&name=12%20Days%20of%20Cuddle%C2%AE%20(7).png)
.png?width=640&name=12%20Days%20of%20Cuddle%C2%AE%20(2).png)
.png?width=640&name=12%20Days%20of%20Cuddle%C2%AE%20(6).png)


Leave a Comment