Written by Cuddle® Ambassador Tammy Campa
Hello! I’m Tammy Campa, a Shannon Fabrics Cuddle® Ambassador in Boise, Idaho. Today, I’m excited to share a fun project that’s perfect for the winter season – a snowflake-themed table topper! This project combines Shannon Fabrics’ ultra-soft Cuddle® fabric with a variety of techniques that add precision, texture, and a touch of pizazz! Each step can be adapted with different tools and approaches, making this project accessible and customizable. One standout feature of this project is the use of grid interfacing, a game-changing technique perfect for square-based piecing designs using Cuddle®.
Why Grid Interfacing?
Grid interfacing helps you achieve perfectly aligned blocks in your square-based quilting projects without the hassle of sewing individual squares and rows separately. In this project, I demonstrate the technique using just four squares, but once you master it, you can scale up to more complex designs with numerous small squares. The interfacing stabilizes the fabric, minimizes shifting and stretching, and ensures that your seams are precise and your lines are straight. The result is a polished finish in a fraction of the time that traditional piecing would take.
Materials Needed
● Shannon Fabrics Cuddle® fabric in winter colors and prints, the ones I used include: C3 Snow, C3 Navy, C3 Bluebell, and Snowfall Digital Cuddle® Navy for the quilt top and backing. Luxe Cuddle® Hide Navy for the binding.
● Thin 100% polyester batting - Recommended, Quilter's Dream Batting.
● Grid Fusible Interfacing, or alternatively a featherweight fusible interfacing
● 100% polyester thread
● Sharpie permanent marker
● Rotary cutter with cutting mat and/or scissors - OLFA is a great choice for these
● Cutting mat and ruler
● Long flat-head pins (Clover flower head pins are preferred)
● Snowflake stencil/template for appliqué
● 90/14 stretch needle - SCHMETZ is a great needle brand
● Walking foot or digital dual feed
● Stiletto (I recommend the ByAnnie Stiletto)
● Optional: Embroidery machine or longarm for quilting the project
● Optional: Accuquilt Go! Cutting system and die cutter
● Optional: Odif 505 Temporary Adhesive Glue Stick
Helpful hints:
● Lower your presser foot pressure, increase stitch length to 3-4mm.
● Use a consistent seam allowance for all seams (¼” - ½”). The use of interfacing makes it
safer to use a ¼” seam allowance, rather than the typical ½” seam, since the fabric is
more stable.
● Use a stiletto while sewing to help control the fabric, especially when binding!
Instructions
Step 1: Create the 4-Square Center Block
Cut four 9-inch squares: two in C3 Bluebell, two in C3 Navy, or colors of your choice.Align the squares in a 2x2 pattern on the fusible grid interfacing, ensuring nap goes in the same direction for all squares – if you don’t have grid interfacing, you can draw light colored lines with pencil on Pellon SF101 or some other lightweight interfacing, to assist with alignment.

For each square, carefully lift half of the square while ensuring it does not move out of its alignment, and lightly spray the backside of the fabric with Odif 505 spray. Use scrap paper to protect the surrounding fabric from overspray. Press the fabric back down firmly onto the grid. Repeat on the other half of the square, then repeat the process to adhere the remaining 3 squares.

Flip over the entire 4-square block and use a medium-heat iron to gently press the back of the grid paper; it should adhere to the fabric within several seconds. The spray was just enough to hold the fabric in place to turn it over, but the ironing is what makes the fusible actually fuse to the fabric.

Flip the 4-square block back over so the fabric is facing up, and fold the square in half either vertically or horizontally to create a center seam; pin along the seam. Here you can get away with lightly pinning only perpendicular to the fabric because the interfacing is still connected along the fold line and it helps stabilize the fabric to keep it from shifting.

Sew along the seam.

Carefully cut the interfacing along the seam to allow it to lay open.

Repeat for the other center seam. Trim away the outer excess grid interfacing, and now
your 4-square block is complete.

Step 2: Add the Border
Measure and cut border strips from the print fabric to fit across the top and bottom of the 4-square block, followed by strips to fit down both sides, making sure to account for theadditional length on the sides created by the addition of the top and bottom borderthickness – keep the nap direction consistent for the strips. I chose a 9-inch border thickness all the way around, but you can adjust to your preference.
For consistent stabilization and drape, it is recommended, although not required, that you adhere strips to fusible grid interfacing with Odif 505 spray and press with an iron, just like in Step 1; trim away the excess interfacing.


Attach the border strips to the 4-square block starting with top and bottom pieces, laying the border piece down onto the 4-square piece, right sides together (watch the nap direction!). Double-pin along the seam, with at least one of your pinned rows parallel to the edge for extra stability. Double pinning is necessary since the interfacing is not connected along the edge as it was while creating the 4-square block. Sew the seam. Repeat with the side border strips.


The top layer of the topper is now finished. No need to square up your project at this point, that will happen after you have assembled and quilted all the layers together.

Now is when you will decide how you want your applique snowflake to be incorporated. I chose to appliqué over top of everything. If you prefer to add the applique now, it will get quilted over in the final quilting process, but the applique surrounding stitch will not be visible on the back of the topper. Skip ahead to Step 5 for this option, and then resume from here when finished. If you prefer to apply the applique on the very top, over the quilting, then continue to Step 3 now. Just be aware that the outline appliqué stitch will show on the back.
Step 3: Make the Quilt Sandwich
Rough-cut a piece of batting and fabric for the backing (I used C3 Bluebell) to be a few inches larger than the quilt top around all sides, especially if you plan to longarm or machine embroider quilt the topper.
Sandwich your pieces together, laying down one layer at a time, smoothing and securing each layer with Odif 505 spray to prevent shifting. The backing fabric is placed right side down, followed by the batting, and lastly the quilt top. Make sure the nap of the fabric is going in the same direction as the backing.

Step 4: Quilt the Project
Quilt through all layers using your preferred method.
A) Keep it simple and use a walking foot or digital dual feed to quilt in straight lines or stitch-in-the-ditch
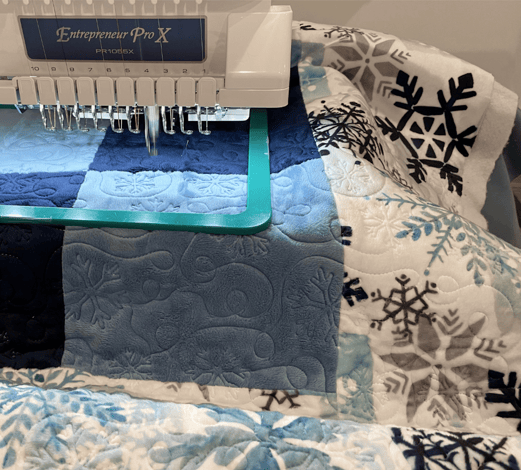
B) Optionally, use an embroidery machine or longarm with a winter-themed pattern for added texture and fun. I chose a medium-dense snowflake edge-to-edge embroidery quilting design.


When the quilting is complete, trim off the excess backing/batting and square up the project.
Step 5: Apply the Appliqué
Adhere a piece of fabric to a piece of Pellon SF101 with medium heat, making sure your fused fabric area is large enough for your applique shape. To make your fabric appliqué piece, trace a snowflake shape onto the interfacing and cut it out with scissors, or use an Accuquilt Go! cutter (with fabric nap side up, interfacing side down). I used the snowflake shape Go! die cutter.

Spray the back of the snowflake with Odif 505 spray, or alternatively apply the Odif 505 temporary glue stick.

Position the snowflake in the center of the quilt topper and firmly pat into place. Sew around the applique with a blanket stitch, or your preferred stitch. You may need to try a few different stitch lengths/widths on practice fabric to decide which stitch settings to use.

Step 6: Attach the Binding
Cut 1¾” x WOF strips of Luxe Cuddle® Hide Navy for binding, making enough binding strips to go around your project with at least 10 inches excess to allow for closing the binding.
(For tips on binding with Cuddle®, watch this tutorial)


Now your beautiful snowflake table topper is complete!

.jpg?width=583&height=389&name=Snowflake%20Table%20Topper%206%20(1).jpg)

%20-%20Copy%20copy.png?width=143&height=69&name=Black%20logo%20(002)%20-%20Copy%20copy.png)
.png)


-Dec-11-2025-10-58-46-1415-PM.png?width=640&name=Untitled%20design%20(3)-Dec-11-2025-10-58-46-1415-PM.png)


.png?width=640&name=SEW%20TOGETHER%20livestream%20promo%20images%20(4).png)
.jpg?width=640&name=gencoreA%20(1).jpg)
-Oct-06-2025-07-25-25-9749-PM.png?width=640&name=SEW%20TOGETHER%20livestream%20promo%20images%20(1)-Oct-06-2025-07-25-25-9749-PM.png)

-4.png?width=640&name=SEW%20TOGETHER%20livestream%20promo%20images%20(3)-4.png)


.jpg?width=640&name=spring%20tea%20party_049%20(1).jpg)


.png?width=640&name=12%20Days%20of%20Cuddle%C2%AE%20(8).png)
.png?width=640&name=12%20Days%20of%20Cuddle%C2%AE%20(3).png)
-2.png?width=640&name=12%20Days%20of%20Cuddle%C2%AE%20(2)-2.png)

-2.png?width=640&name=12%20Days%20of%20Cuddle%C2%AE%20(4)-2.png)
.png?width=640&name=12%20Days%20of%20Cuddle%C2%AE%20(2).png)
.png?width=640&name=12%20Days%20of%20Cuddle%C2%AE%20(6).png)


Leave a Comment