%20-%20Copy%20copy.png?width=143&height=69&name=Black%20logo%20(002)%20-%20Copy%20copy.png)
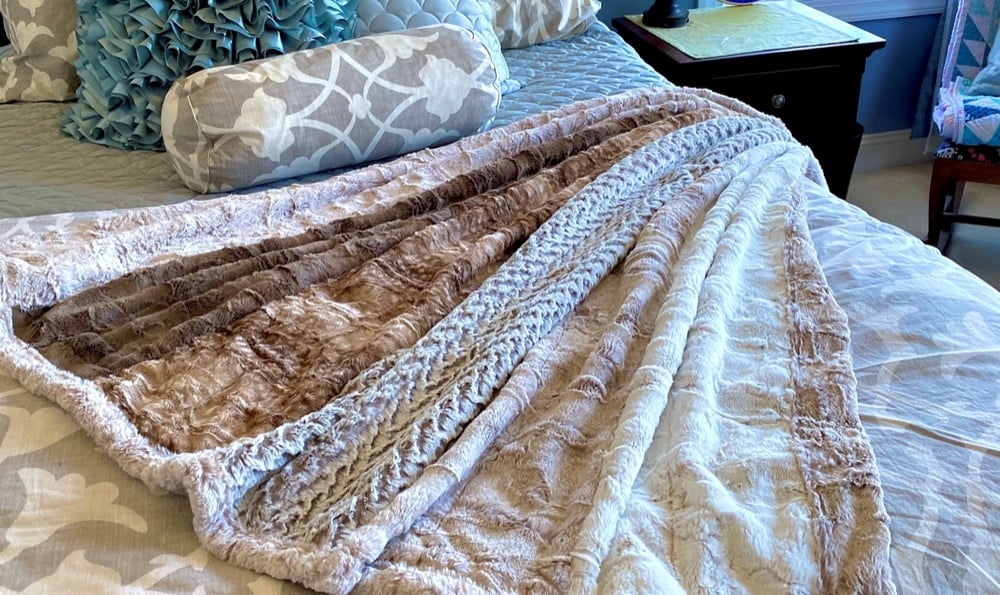
It's still blustery and cold and dreary outside, and I don't like it one bit! So until Spring decides to finally show her face around here, I'll be sticking to my tried-and-true companions for winter warmth: cozy quilts, yummy treats and coffee!
.jpeg?width=600&name=IMAGE%201%20(2).jpeg)
See Related: How to Sew an Irresistibly-Cute Strip Quilt (Bambino Cuddle® Kit with Pattern)
How to make a Lap Quilt with Cuddle® Precuts
Fabrics Used
When Shannon Fabrics released their new Sweet Strips and Cuddle® Cuts, I was elated! I've been wanting to make a new lap quilt or two for Mister Ditty and myself for a while now and just have never gotten around to it. But now I have one ready for snuggling, and I did it ALL in one day! ONE DAY, y'all!
Granted, I used my longarm machine to quilt-as-you-go, but even a domestic machine would be able to knock this out in a day. Heck — half a day to be honest!
.jpeg?width=600&name=IMAGE%202%20(3).jpeg)
I'm speaking in longarm terms here, but just substitute with domestic know-how if that's what you're using — easy peasy!
Preparation
First, I loaded the 2-yard Cuddle® Cuts onto the longarm as my quilt backing (Pro Tip: Use SewTites Magnums to load the leaders of your longarms). I slip the Magnum flat backs through the looped pocket of each leader so they're there 24/7. Then I just lay the fabric along the leader edge and quickly (and painlessly) snap the Magnums on top to lock the fabric in place. Game changer! You can totally snag these (or any other SewTites) for 15 percent off using my personal code "SARIDITTY".
I chose not to use a batting layer since the Cuddle® is thick and warm on its own. I figured a Cuddle® backing and top would be ample. Now to start stitching!
Regardless which machine you're using, if a cupped foot of some sort is available to put on, I highly recommend it! Having that foot gliding over the long Luxe Cuddle® fibers made stitching a breeze and no worry at all of my foot catching on the longer fibers.
.jpeg?width=600&name=IMAGE%203%20(1).jpeg)
Assembling
I placed one Sweet Strip right side up over the backing. They're both roughly the same width, so just take note that there isn't a typical excess of the quilt backing. That's okay! I used it to my advantage when I was finishing up — simply center the strip as well as possible over the backing.
Again, I used my SewTites Magnums to secure the strip to the backing to eliminate slipping and sliding as I stitched across the top. My first pass used 1/4" seam allowance, which I then realized could easily hide the Cuddle® foundation from the soft fibers, so I increased each seam allowance to 1/2" going forward.
.jpeg?width=600&name=IMAGE%204%20(2).jpeg)
Adding the Strips
Once the strip was stitched down across the top, I added basting stitches to each short side edge. Again using the Magnums to smooth and keep Strip 1 in position, I added Strip 2 right side down directly on top of Strip 1. Grabbing those Magnums again, I clipped a few on top of Strip 2 to keep it in place as well. Then stitch across the bottom of Strip 1/Strip 2 layer with a 1/2" seam allowance.
.jpeg?width=600&name=IMAGE%205%20(1).jpeg)
.jpeg?width=600&name=IMAGE%206%20(1).jpeg)
Once Strip 2 layer is sewed down, flip it right side up, smooth down in place, clip on Magnums for placement safety, baste along the two short edges and repeat all that again for Strips 3, 4 and 5.
Once you've stitched all the Strips in place and have all the edges (including Strip 5 bottom edge) basted down, go back and add a stitched line through the middle of each strip. Since the Sweet Strips are 10" wide, with roughly 9" showing on top taking in seam allowance considerations, I felt that was still too much slack to have slipping and sliding around, so I decided one more quilted line through each strip wouldn't be a bad idea.
.jpeg?width=600&name=IMAGE%207%20(1).jpeg)
Quilting Math
Now let's do some basic quilt math for a moment. Don't worry — I'll do it for you!
Each Sweet Strip is 10" wide with about 9" finished on top. Each Cuddle® Cut is a 2-yard length. My math works out that about 46" of Sweet Strips is showing for my quilt top with about 26" of backing untouched. I'll go ahead and admit it now, I should've thought this out ahead of time and centered the strips on the backing.
Originally I had planned to cut off the backing excess to make binding, but my process immediately changed when I saw what was in front of me!
Trimming and Finishing
I removed the quilt from the longarm and brought up to my studio. Instead of cutting off the backing excess, I folded the longer (bottom) end (wrong sides together) and turned in about 1/2" to 3/4" of the cut edge for a "rolled hem."
Then using more SewTites (regular ones this time), I clipped the rolled edge on top of the bottom basting stitch across Strip 5's length.
.jpeg?width=600&name=IMAGE%208%20(1).jpeg)
Using the walking foot to minimize fabric shifting, I stitched down the rolled edge and made a 6th Strip with the backing excess along the bottom. I also stitched another line down the center of Strip 6. Then I repeated for the top edge of the backing; however, my excess was only about 6" here, so my new Strip 1 is only about 3" wide. "Unique Design Element" is what I call my quilting accidents — *wink*.
Binding
Now to "bind" the two long edges of this quilt. Since the Sweet Strips are pretty much the same width as the Cuddle® Cuts, all I trimmed off were the Sweet Strip edges that were more than 1/2" wide than the backing width.
It was minimal — truly. Now I rolled in the edge for a "bound rolled hem" and top-stitched with the walking foot. This was so much simpler and faster than ever attempting to create an actual binding strip.
From start to finish, I'd say I was completely done in about 2 1/2 hours! How's that for a simple and easy quilt? Even Dutch the boxer approves of "his" new cozy quilt!
.jpeg?width=600&name=IMAGE%209%20(2).jpeg)
.jpeg?width=600&name=IMAGE%2011%20(1).jpeg)
Now I've got my cozy quilt and puppy snuggles, coffee and this amazing Lemon Cranberry Bread I baked! I won't leave you hanging either — here's the recipe since I know you're going to ask!
Lemon Cranberry Bread
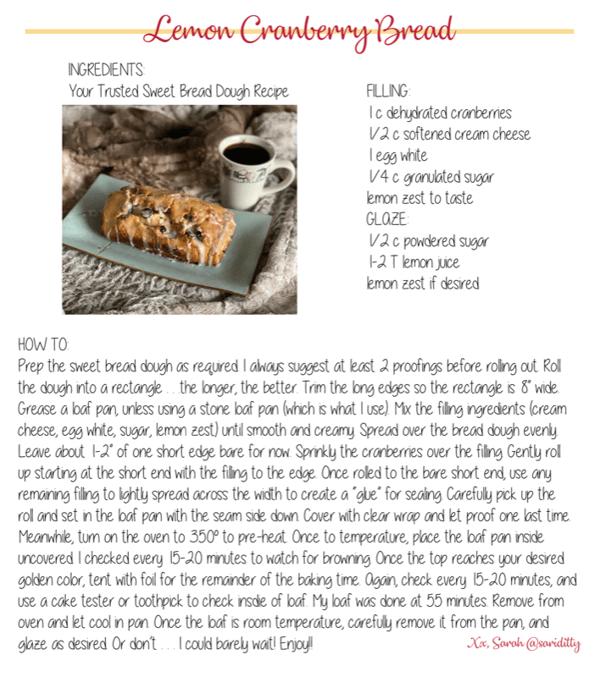
Happy stitching, stay warm and fill that belly! Enjoy! You can find me at @SARIDITTY on Instagram for all sorts of quilt-y and colorful (and yummy) goodness!
Xx, Sarah
If you have any questions about Cuddle® minky plush fabrics or any of our Cuddle® Kits, feel free to contact our friendly, no-pressure customer service team at 866-624-5252.
Ready to start creating with Cuddle® minky fabric? Use our store locator to find a selection of Cuddle® minky fabric online or near you.


.jpeg?width=640&name=Image%20(5).jpeg)


.png?width=640&name=SEW%20TOGETHER%20livestream%20promo%20images%20(4).png)
.jpg?width=640&name=gencoreA%20(1).jpg)
-Oct-06-2025-07-25-25-9749-PM.png?width=640&name=SEW%20TOGETHER%20livestream%20promo%20images%20(1)-Oct-06-2025-07-25-25-9749-PM.png)

-4.png?width=640&name=SEW%20TOGETHER%20livestream%20promo%20images%20(3)-4.png)


.jpg?width=640&name=spring%20tea%20party_049%20(1).jpg)


.jpg?width=640&name=self%20binding%20blanket%20c3%20caramel%20Image%20from%20iOS%20(5).jpg)


.jpg?width=640&name=pinkdresses1%20(2).jpg)


-1.jpg?width=640&name=Image%20from%20iOS%20(9)-1.jpg)


-1.jpg?width=640&name=Image%20from%20iOS%20(3)-1.jpg)


Leave a Comment