%20-%20Copy%20copy.png?width=143&height=69&name=Black%20logo%20(002)%20-%20Copy%20copy.png)
Minky plush fabrics are quickly becoming a reliable go-to option for all types of quilters and sewists.
Why?
Not only is minky fabric available in virtually limitless color options, but it’s also available in multiple different textures and widths, as well as digitally printed, too.
Pair these features with its durability and wearability, and it’s no surprise why minky has exploded in popularity in recent years.
But no matter if you’re an experienced sewist or quilter who has worked with minky plush fabrics before, or you’re new to this unique fabric and are trying it for the first time, there are a few minky fabric sewing tips to keep in mind.
READ MORE: How Much Does Minky Plush Fabric Cost? A Guide to Minky Fabric Prices
It’s a super-soft synthetic fabric that has a bit of a learning curve, so with the right techniques, your sewing experience will go from good to great. And here at Shannon Fabrics, we’re all about maximizing the sewing experience from the fabric we’re so passionate about ourselves.
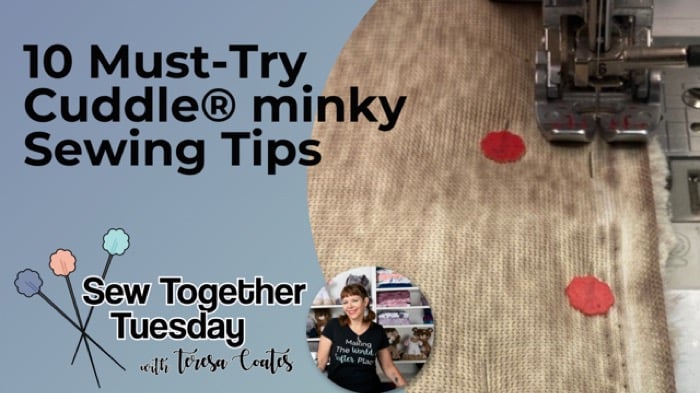
From cutting with the right tools to proper sewing techniques, this week our National Educator Teresa Coates has listed ten minky fabric sewing tips you should keep in mind as you tackle your next minky fabric sewing project (click here to download).
She's streaming LIVE to our Facebook page and YouTube channel from Red-Roxy Quilt Co. (click here to learn more) Tuesday July 27 at 10 am PT — we hope you can join us!
Did we miss something? Do you have any minky fabric tips you’d like to share? We’d love to hear from you — leave us a comment in the comment section below!
Top 10 Minky Plush Fabric Sewing Tips
Click here to download Teresa's minky plush fabric sewing tips.
- Mark minky fabric before you cut it
- Cut minky fabric with the right tool
- Get rid of the minky fabric mess before you sew
- Use double pinning to keep minky fabric stable
- Lengthen your stitch and lower your pressure
- Use a 90/14 stretch needle
- Use a walking foot
- Sew with polyester thread
- Use basting spray to keep the fabric smooth and in position
- Wash correctly to keep the fabric looking its best
Fox: Kawaii Kuties - Easy funky baby FOX INSTANT DOWNLOAD Sewing Pattern PDF by Funky Friends Factory
Minky Fabric Sewing Tip #1: Mark minky fabric before you cut it
Minky fabric stretches because it’s a knit, which can cause it to be a bit shifty when sewing and cutting. While this (combined with the nap) adds to the overall plushness, it can be a little tricky to sew without the right techniques.
First, lay your piece of minky fabric on a flat surface — this can be done on the floor, dining room table or a cutting mat depending on the size. Use a ballpoint pen or a permanent marker to mark your cutting lines or curves on the back of the fabric.
We’ve found that a Quilters Select ruler works well with minky, as the back has a tacky surface that holds nicely in place. You can also take a ruler you already own and spray Odif’s Grippy Non-Slip Coating spray on the back for the same effect.
Minky Fabric Sewing Tip #2: Cut minky fabric with the right tool
Once your fabric is marked, it’s now time to cut. A rotary cutter, scissors (we recommend Famore or Kai) or a craft knife (we recommend OLFA) works well with minky fabric, but it depends which type of minky fabric you’re working with.
READ MORE: What is Minky Fabric? (Material, Textures, & Projects)
Regular minky fabric (our Cuddle® 3 fabric or Cuddle® dimple) works especially well with a rotary cutter — it’s quick, easy and minimizes the mess. If you want to be a little more careful, lay your ruler back along the line and use it as a guide for the blade.
If you’re working with minky fabric that has a higher pile (our Luxe Cuddle® or Luxe Cuddle® Llama), a craft knife is a better option. Hold a little pressure and drag the knife along the marked line, and this will only cut the backing, not the fibers underneath.
This creates much less of a mess, while allowing you to keep a plush edge. If you use a rotary cutter on thicker minky fabrics, you’ll cut off the fibers on the edge and you’ll end up with a hard line.
If you’re planning on cutting shapes out of minky fabric, scissors are your best option. Shoot for something with shorter blades and a pointy tip for better accuracy. Cut a small hole in the fabric backing, then slowly cut just the backing until you’ve completed your shape.
Don’t worry, this doesn’t take as long as is sounds!
Minky Fabric Sewing Tip #3: Get rid of the minky fabric mess before you sew
Different types of cuts will create different amounts of mess (we endearingly call this “Cuddle® dust”), but if you’re cutting several pieces of fabric, it’s important to get rid of the mess before you start sewing with your pieces.
Dealing with minky fabric mess is about as easy as it gets. Take a wet washcloth and gather all your pieces, and throw them in the dryer.
READ MORE: Top 5 Minky Plush Fabric Problems, Concerns & Solutions
Let them tumble around in the dryer on low or no heat for five to ten minutes, and all of the small fibers will end up in your lint trap. Check the lint trap every few minutes and when you stop accumulating Cuddle® dust, take the cut pieces out of the dryer.
If you don’t have a dryer at home, you can use a small handheld vacuum to vacuum off the strips and then take them outside to give them a good shake.

Minky Fabric Sewing Tip #4: Use double pinning to keep minky fabric stable
Just as we mentioned how minky stretch influences cutting, stretching can also be a bit of an issue when sewing. Luckily, a few techniques can stabilize the fabric, making it easier to sew and work with.
Our double pinning method is a quick fix for most minky fabric projects, especially if you’re making a larger throw or a strip quilt.
Start with a pin (we recommend Clover Flower Head pins) in the center of the edge you’re working on, and work your way to the outside edges. All you have to do is pinch the two pieces of fabric in place, then pin it. Once the first row of pins is in place, start pinning the second row parallel to the first, with pins in alternating positions.
When you take the first row of pins out to sew, the second row of pins will keep the fabric from sliding. Of course, take the second row of pins out once that side of the fabric has been finished.
Minky Fabric Sewing Tip #5: Lengthen your stitch and lower your pressure
We recommend a straight stitch with a polyester thread when sewing with minky fabric, and the most important thing to remember is to up your stitch.
What does this mean?
Most patchwork quilters are used to using a two- or three-millimeter stitch length, but a stitch that short isn’t advised for minky fabric. Start with a three- or three and a half-millimeter stitch length, and you can always up it to four millimeters if needed and depending on how your machine is handling the fabric.
Ultimately you want to make sure you’re getting a nice, long stitch. If you make a mistake while sewing and have to take it out, it’s easier, and it’s also easier to see what you’re doing.
READ MORE: Minky Plush Fabric vs. Fleece Fabric: A Side-By-Side Comparison
Don’t forget to open up the presser foot pressure on your machine if the fabric isn’t feeding through very well — this might require you to pull out your manual to figure out how to do so, but it makes sewing with minky fabrics that much easier.
Minky Fabric Sewing Tip #6: Use a 90/14 stretch needle
We recommend using a 90/14 stretch needle (we love SCHMETZ needles) when sewing with minky fabrics.
Let’s explain.
Minky fabric is a knit, so using a stretch needle will help prevent making holes in the fabric and it helps prevent skipped stitches.
The end is rounded and not quite as sharp as a universal needle, and the scarf (where the thread goes through) is larger, which allows it to go through the fabric easier.
If you’re using a thicker minky or batting, you might want to try upping the size of the needle, but generally speaking, the 90/14 works well.
Minky Fabric Sewing Tip #7: Use a walking foot
If you haven’t bought a walking foot for your machine yet, we recommend doing so (they generally come with most machines now). They’re great for working with minky, but they’re also good for other types of fabric as well.
READ MORE: The 6 Best Minky Plush Fabric Wholesalers (Reviews/Ratings)
A walking foot drops down to hold the fabric, but lifts up as you sew, which feeds the fabric through much more smoothly and efficiently.
Unity the Unicorn by Melly & Me
Minky Fabric Sewing Tip #8: Sew with polyester thread
Sew with polyester thread to increase stitch strength (we recommend Mettler METROSENE)! Because minky fabric is a knit polyester, it has stretch inherently. Polyester thread has a bit of stretch as well, so when you combine the two they work together nicely (and don't forget about the bobbin!).
If you use cotton thread in Cuddle® minky, when the fabric stretches, the thread will often break. This is especially important on children’s blankets and quilts as little ones can be pretty rough on them.
Minky Fabric Sewing Tip #9: Use basting spray
Put basting spray to work to keep fabric smooth and in position while sewing. Basting spray is a great way to hold strips in place when pinning or holding two layers together while binding.
We recommend ODIF 505 Temporary Fabric Adhesive, and the stickiness will wash out with a normal wash. Cover your work area, but overspray can be cleaned up with soap and water.
Minky Fabric Sewing Tip #10: Wash correctly
While minky fabric is durable, it's important to wash it the right way to keep it looking its best. Shannon Fabrics recommends washing Cuddle® in cool and doing a tumble dry on low. Take it out before it’s fully dry, then let it air dry. Throw it back in for a tumble and it should be good as new.
Make sure to wash heavily-used blankets or pillows frequently as oil and dirt can build up. If needed, wash with a 1/2 cup white vinegar, and never use fabric softener (both sheets or liquid).
Next Steps
Now that you’re inspired and have learned what to keep in mind when sewing with minky fabric, it’s time to get to work!
Not only is minky super soft, durable and available in a wide range of colors and patterns, but it can be used in ways you might not expect.
Self-binding baby blankets and throw blankets are great projects for beginners (and are perfect gifts, too), but minky works well in a variety of other applications. Click here for a breakdown of nine of our favorite sewing projects and uses for minky plush fabric.
We’ve also compiled a collection of free resources that include tips and tricks on how to sew with minky plush fabric, as well as free patterns.
Keep in mind there can be a bit of a learning curve when working with minky fabric, so don’t get frustrated if things don’t go as smoothly as planned on your first project. Remember, you can always use your seam ripper and try again.
Our National Educator Teresa Coates or one of our friendly brand ambassadors are always happy to connect and give you pointers, too.
To purchase minky plush fabric for your next sewing project, use our store locator to find available fabric near you!


.jpeg?width=640&name=Image%20(5).jpeg)


-Dec-11-2025-10-58-46-1415-PM.png?width=640&name=Untitled%20design%20(3)-Dec-11-2025-10-58-46-1415-PM.png)


.png?width=640&name=SEW%20TOGETHER%20livestream%20promo%20images%20(4).png)
.jpg?width=640&name=gencoreA%20(1).jpg)
-Oct-06-2025-07-25-25-9749-PM.png?width=640&name=SEW%20TOGETHER%20livestream%20promo%20images%20(1)-Oct-06-2025-07-25-25-9749-PM.png)

-4.png?width=640&name=SEW%20TOGETHER%20livestream%20promo%20images%20(3)-4.png)


.jpg?width=640&name=spring%20tea%20party_049%20(1).jpg)


.png?width=640&name=12%20Days%20of%20Cuddle%C2%AE%20(8).png)
.png?width=640&name=12%20Days%20of%20Cuddle%C2%AE%20(3).png)
-2.png?width=640&name=12%20Days%20of%20Cuddle%C2%AE%20(2)-2.png)

-2.png?width=640&name=12%20Days%20of%20Cuddle%C2%AE%20(4)-2.png)
.png?width=640&name=12%20Days%20of%20Cuddle%C2%AE%20(7).png)
.png?width=640&name=12%20Days%20of%20Cuddle%C2%AE%20(2).png)
.png?width=640&name=12%20Days%20of%20Cuddle%C2%AE%20(6).png)


Leave a Comment